Tuesday, June 26, 2012

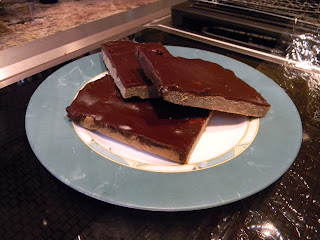
Frosted Chocolate Peanut Butter Protein Brownies

As I mentioned in my last post, I have been doing P90X for a while now (I'm on my 7th week) and have been trying to follow the nutrition guide. There's one thing I'd like to make clear.... this is NOT a diet. It's simply a nutrition plan designed to help people doing the P90X program get the best possible results. What I love about it is that you have the option to follow a menu that tells you exactly what to eat for each meal and snack every day or you can go with the "portion plan" and pick what items you want to eat from the list of categories (carbs, protein, veggies, etc.) based on the appropriate number of portions for your calorie level. This is the option I chose and I've found that it's really easy to follow and it's actually pretty fun coming up with tasty (and healthy!) recipes using the stuff from the list.

So, here is my latest experiment... frosted chocolate peanut butter protein brownies! In Phase 2 of the nutrition plan I'm supposed to shoot for 40% carbs, 40% protein and 20% fat. For the calorie level I'm using that ends up being A LOT of protein so I have to come up with creative ways to get some extra protein in my day without just eating like 2 pounds of chicken. One of the easiest ways to get extra protein is to eat a protein bar, but so many of the bars you find at the store have a ton of sugar (20+ grams per serving for some of them!). I decided that not only would it be healthier to try to make my own bars, but it would actually be more cost effective since protein bars generally cost $1 to $3 each. I made my first attempt using this recipe for peanut butter protein bars. I'm not sure whether it was because I used powdered peanut butter in place of the peanut flour (does anyone know how much difference there is?) but I didn't think they turned out very well. I found them a little tasteless and dry.


 I wanted to try again but didn't think that doctoring the recipe a little bit would be enough, so I set out to completely make up a recipe. I did a little research about various leavening ingredients, baking powder versus baking soda, etc. and compiled some of the ingredients I knew I wanted to include - powdered peanut butter, chocolate whey powder, applesauce (to keep it moist), egg whites and baking powder (to make it rise) and regular peanut butter (to make the topping). Once I had all my ingredients I began tinkering with quantities, using various brownie/protein bar recipes I found online for reference. Then I tested the recipe!

I began by whisking the wet ingredients and the dry ingredients in separate bowls then added the wet ingredients to the dry, whisking them together. I then poured the batter into a foil-lined 8x8 square baking pan. It came out just fine once it cooled but in retrospect it might have been a good idea to spray the foil or just spray the pan and cut out the foil. I threw the brownies in the oven at 350 for 10 minutes and it began to rise a little bit but was still pretty moist. So, I turned up the heat to 400 and baked them for another 10 minutes and they came out perfect! Very moist and cakey with that brownie-like flakey crust on top.


I let the brownies cool while I prepared the "frosting". I started with 6T of peanut butter that I'd microwaved for about 35 seconds to get it nice and melty. I then added 2T unsweetened baking cocoa, 1T soy milk and 1t agave nectar (I wanted to sweeten it a bit but, like I said, I was trying to avoid too much sugar). As I mixed and tasted the frosting I needed to add more agave to combat the unsweetened cocoa and more soy milk to make it creamy. By the time I had it the way I wanted it I had used about 1T agave and 3T soy milk.


Once the brownies had cooled completely I spread the frosting on top and popped it in the fridge to set up. I wasn't sure whether the frosting would harden the way it did in the first recipe I tried originally, but I figured I'd give it a try. It didn't end up hardening after all, it just retained that classic frosting-like texture. I decided to keep the brownies in the fridge because I tend to like my desserts cold but you could just cover them in plastic and keep them on the counter if you prefer. I found that keeping them in a plastic bag in the fridge held in all the moisture so they are pretty moist... if you kept them out on the counter they might retain more of that cakey brownie texture. I just tasted one and it was really tasty! It is definitely dessert-like enough to satisfy my sweet tooth but also gives me some of the protein I need. Feel free to make additions in your own experiments with this recipe... try sprinkling toasted walnuts on top or, if you don't mind a few extra calories, use semisweet chocolate chips instead of cocoa powder in the frosting and skip the agave.


Here's the recipe!

Ingredients:

3 scoops chocolate whey powder (I used Muscle Milk chocolate)
3/4 c (12 T) PB2 powdered peanut butter
1/2 t salt
1/2 baking powder
6 T Egg Beaters whites (could also just use 2 egg whites)
1/2 c soy milk
1 t vanilla extract
1/2 cup applesauce
1 t agave nectar

Frosting:
6 T creamy peanut butter
2 T unsweetened cocoa powder
1 T agave nectar
3 T soy milk

Instructions:

  1. Preheat the oven to 400 and line an 8x8-inch square baking pan with foil. You may also simply spray or grease the baking pan.
  2. Combine the wet ingredients in a medium mixing bowl, using a whisk to combine.
  3. Combine the dry ingredients in a small mixing bowl then add them to the wet ingredients, whisking to combine.
  4. Pour the batter into the prepared pan and bake at 400 for 16 to 20 minutes until toothpick inserted in the center comes out clean.
  5. Set the pan on a cooling rack and allow it to cool completely as you prepare the frosting.
  6. Microwave the peanut butter for 30 to 45 seconds until melted and creamy.
  7. Combine the soy milk with the agave and unsweetened cocoa powder then stir it into the peanut butter.
  8. Spread the frosting on the cooled brownies and cut into 8 slices. Store in the refrigerator or on the counter, covered in plastic.
Nutritional Information:
Calories: 197, Carbs: 16g, Fat: 10g, Protein: 15g, Sugar: 7g, Fiber: 4g

** Please do not copy these images for your own use. You are free, however, to share this post on Pinterest and other social media sites.
Monday, June 25, 2012

Well this should be fun....

So, it would seem that I've developed lactose intolerance sometime during the past few years. I'm not positive yet that that's what the problem is, but this diagnosis seems the most likely. I've been having food-related issues for a while but just kinda thought that was how my body worked... never really took the time or made the effort to see if maybe something in particular was triggering it. I started doing P90X about 6 weeks ago and a few weeks in decided to start following the nutrition guide. The first phase of the guide had me eating a high-protein diet while limiting carbs (its a 50% protein/30% carb/20% fat diet) to shred fat and help build lean muscle. As part of the plan I was eating egg whites for breakfast pretty much every morning... omelets, scrambles, breakfast sandwiches... so for a while I thought it was the eggs. I cut them out, but after a few days was still having problems so I finally realized that maybe it was dairy.

I did some research online and found that it's actually not that uncommon for adults to develop lactose-intolerance. According to this site, over 30 million Americans develop some level of intolerance by age 20. I guess that makes me a statistic. Like I said, I'm not positive that's what the problem is - it could be some other kind of food intolerance. I'm trying to get in touch with my doctor to see about allergy testing but she doesn't tend to be very prompt about returning phone calls. Until then, I'm gonna see how it goes with soy milk and lactose-free cheeses.


This also means that my cooking could be affected... I know there are products out there to help people who have lactose-intolerance with the digestion of milk-based foods, but I think it might be fun to experiment with some dairy-free baking. I am pretty upset over the loss of ice cream, one of my favorite foods... but I'm willing to give non-dairy ice cream a try. Has anyone tried it and, if so, what brands are your favorite? I've seen recipes on Pinterest for homemade ice cream using bananas and/or coconut milk... can't say I'm crazy about either of those flavors but it might be worth a try.

Stay tuned, I guess, to see how things progress from here. In other news, my zucchini plants are doing really well and there are several zucchinis that I think will be ready to harvest this week. Check back soon to see what kind of tasty zucchini recipes I decide to try out... I'm thinking chocolate zucchini muffins, mini zucchini pizzas and oven-roasted zucchini boats. Yum!

Sunday, June 24, 2012

Strawberry-Stuffed Monkey Bread


I love strawberries, so any time I can figure out a way to add them to a recipe, I do. As I mentioned in my last post, I spent most of this weekend with Will's family and wanted to bring along a few tasty treats. As I was browsing online, looking at various blogs and recipes sites, I kept seeing recipes for cinnamon sugar pull-apart bread, aka Monkey Bread. That sounded pretty good to me (and the pictures looked absolutely delicious) but I wanted to come up with some way to make it a little more... interesting. I considered using apple but then I came across a box of strawberries in the fridge that I had forgotten about (jackpot!!). So began my adventure....


Normally, I like cooking completely from scratch but I was a little short on time this week so I decided to use store-bought biscuits as the dough for my strawberry-stuffed monkey bread. Even though I went with Giant Eagle brand biscuits, I decided to use the Pillsbury recipe for pull-apart bread as a base. This recipe is pretty basic and is super easy to follow, so if you're not familiar with monkey bread and aren't sure you're up to the challenge of strawberry-stuffed monkey bread, you might want to try this one first. Because this recipe was so basic, however, I had to look elsewhere for ideas on how to incorporate the strawberries. I ended up at TasteofHome.com where I found a recipe for apple pull-apart bread.

So, equipped with my recipes, I assembled my ingredients and got to work. I began by opening the biscuits - I used Giant Eagle homestyle biscuits which came 10 to a tube. Having used Pillsbury Grands before, I knew these biscuits were significantly smaller so I didn't divide them as the Pillsbury recipe suggests. Instead, I just laid them out on a well-floured counter top and stretched/flattened them out to about 2 1/2 inches in diameter. Next, I prepared my melted butter and my cinnamon/sugar mixture. Finally, the strawberries. Somewhere along the way while researching ideas for this recipe I came across a strawberry breakfast bread that suggested combining the strawberries with honey. Following this suggestion, I mixed my sliced strawberries (about 3 cups) with about 1/4 cup of honey.


On to the assembly! So, if you've ever made traditional monkey bread you probably dipped the pieces of dough in melted butter, rolled them in cinnamon/sugar and stacked them in the pan. This is the basic procedure I followed but I first stuffed the pieces of dough with the strawberry/honey mixture. To accomplish this I flattened the biscuits, spooned about a teaspoon of the strawberry mixture into the center of each biscuit, then rolled it up. This part was a little tricky but I eventually I figured out a good way to go about it... Lay down the scoop of strawberry mixture then fold down one side of the biscuit over top of it. Fold the opposite side of the biscuit over and finish it off by pulling in the sides and pinching it all together. It may take you a few tries to figure out a technique that works for you -- don't worry if the strawberry mixture oozes out a little bit.


From here on out, it's pretty easy. Just dip your strawberry-stuffed biscuit pieces in the melted butter, roll them in cinnamon/sugar and stack them in your tube cake pan. I ended up using 10 biscuits single-stacked in my first layer and the second layer had two rows, totaling 21 biscuits. After putting down the first layer of biscuits I scooped a little of the strawberry/honey mixture over the biscuit pieces before putting down the second layer. I repeated this process after the second layer, using all that was left of the strawberries and honey. Since I had 9 biscuits left (and because I was worried about whether the dough would hold together with all the added liquid from the strawberries and honey) I flattened the remaining 9 biscuits, dipped them in butter then cinnamon/sugar and layered them flat on top of the second layer of strawberry-stuffed biscuit pieces.

(Sorry, the bread is already baked in this picture... forgot to take one beforehand)

The last step, of course, is to bake it! I assembled the bread on Thursday night but didn't want to bake it until I got to Erie on Friday so I just stored it in the fridge overnight and packed it on ice for the drive. When I got to Erie I discovered that there was a lot of liquid in the pan... I ended up pouring a little of it off before throwing it in the oven that I had preheated to 325. Like most of my baking endeavors, this became a bit of an experiment because while I had the Pillsbury and TasteofHome recipes to use for reference, I really wasn't sure how to bake this thing properly. I ended up baking it for about 50 minutes at 325 then poured off the rest of the liquid that hadn't baked in and turned up the temperature to 350 for another 8 minutes or so. I'm not sure if it would have helped to bake it at 350 the whole time - probably, because the dough was still pretty wet after 45 minutes in the oven. Overall, though, it turned out really well and tasted delicious! The dough was light and fluffy and the strawberry filling cooked through the bread, creating a sweet glaze on the outside of the cake.


So, here's the recipe!

Ingredients:
4 cans (10-count, small) refrigerated biscuits
1 cup granulated sugar
1T ground cinnamon
1 cup butter (melted)
3 cups sliced strawberries
1/4 cup honey

Instructions:

  1. Preheat the oven to 325 and grease a tube cake pan.
  2. Open the cans of biscuits and set aside 9 or 10 for the top layer. Flatten the rest of the biscuits on a floured surface, stretching them by hand, to a diameter around 2 1/2 inches.
  3. Dice the strawberries and combine them in a bowl with 1/4 cup honey. (I sliced the strawberries but realized it would have made it easier to stuff the biscuits if they'd been diced.)
  4. Scoop 1 teaspoon of the strawberry/honey mixture into the center of each biscuit. Fold over the edges and pinch them together, creating a strawberry-stuffed biscuit pocket.
  5. Dip the stuffed biscuit pockets in melted butter and roll them in cinnamon/sugar.
  6. Layer 8 to 10 biscuit pockets in the bottom of the greased tube cake pan. Spoon some of the strawberry/honey mixture over top of the biscuits.
  7. Layer another 20 to 22 biscuits on top of the first layer in the pan and spoon the rest of the strawberry/honey mixture over top. 
  8. Flatten the remaining 10 biscuits, dip them in butter and coat them in the cinnamon/sugar mixture.
  9. Lay the flattened biscuits on top of the second layer of biscuits, overlapping the edges. 
  10. Bake at 325 for 45 to 50 minutes. Check the dough - if it is still wet, pour off the liquid and bake for another 8 to 10 minutes at 350. 
  11. Let the bread cool in the pan for 15 minutes or so on a cooling rack.
  12. Turn out the bread onto a large plate and serve while still warm. Cut the cake into slices or let your guests pull apart pieces of the bread by hand.
The traditional method of checking to see whether a cake is done by inserting a knife into the center may not work for this recipe because the dough will be moist from the strawberry stuffing. When it is done correctly, the top layer of biscuits should be lightly browned around the edges and the dough should be puffy and fully cooked, not wet. Like I said, this was a bit of an experiment for me so if you find a temperature/timing combination that works for you, let me know!


** Please do not copy these images for your own use. You are free, however, to share this post on Pinterest and other social media sites.

Friday, June 22, 2012

Vegan Baked Oatmeal Cups

I recently hopped on the Pinterest bandwagon (about two weeks ago) and since then have accumulated dozens of recipes I am dying to try. This weekend I'm headed up to Erie with my boyfriend Will's family to go to one of his cousin's weddings in Cleveland. As soon as we started making plans the wheels in my head began turning, churning out ideas for what kind of recipes I could try out. I decided that I wanted to make something for breakfast that I could also use here at home.... I ended up settling on these individual baked oatmeal cups!


When I first came across this recipe on Pinterest, I was super excited. For some reason, I've been craving oatmeal lately and I generally don't like oatmeal. I like it in muffin form, but not in a bowl... something about the consistency just doesn't sit well with me. My stomach started rumbling at the thought of a warm oatmeal muffin loaded with cinnamon and raisins... I ate one just before starting this post and my stomach is rumbling again just thinking about it!

So, the thing about my baking style is that it's a little.... impulsive. I like to make changes and substitutions on a whim depending what I have and what I'm craving. This project involved some necessary changes, however, because Will's two sisters are vegan. I decided to make my first attempt at using milled flaxseed as an egg substitute and swapped out the regular milk for soy milk.


I began by mixing together the wet ingredients (except for the milk) in my KitchenAid stand mixer (my new favorite toy... just splurged on it about a month ago). The recipe calls for 2 eggs but, because I wanted to make this recipe vegan, I substituted 2T milled flaxseed and 6T water. The recipe also calls for 2 cups of unsweetened applesauce and one mashed banana. I didn't have a banana and only had 2 cups of applesauce so I improvised by chopping about a cup of fresh apple and popped it in the microwave for a minute with half the honey called for in the recipe to soften it up. I then pulsed the apple/honey mixture in my food processor for a few seconds and added it to the rest of the wet ingredients.

Next came the dry ingredients. Aside from the baking powder, cinnamon and salt the only other dry ingredients are the flaxseed and oats. Unfortunately, I didn't check my supply of old fashioned oats before I started so when I ran out I had to use quick oats to finish off the 5 cups required. Last, I added the soy milk. I added the first 2 cups of it and mixed it to see what the consistency was like. The original recipe notes that the mixture will be pretty runny but I wanted to make sure that it didn't get too runny as a result of the extra moisture from the apple I substituted for the banana. Everything looked fine, though, so I added the last 3/4c of milk and finished stirring.


Once the mixture was ready I poured about 1/4c of oatmeal mix into my prepared muffin tins. I learned my lesson after making some oatmeal muffins last week that you must spray the muffin liners to prevent the oatmeal from sticking. Believe me, it's a lot easier than spending five minutes trying to peel soggy paper off your muffin before you can eat it. The original recipe says it yields 18 muffins but somehow I ended up with 30... maybe it has something to do with the quick oats? Who knows. I baked them at the prescribed temperature for the same time (30 minutes at 350) and they turned out just fine. As suggested, I sprinkled some of my favorite toppings on some of the cups before throwing them in the oven. I went with chocolate chips, raisins, fresh blueberries and chopped walnuts but you could try pecans, dried cranberries, dark chocolate chips, or whatever else you like.


Here's the recipe I used:

Ingredients:

2T milled flaxseed (this was in place of the eggs)
6T water
2c unsweetened applesauce
1c chopped apple (microwaved 1 min with 1/2 honey)
1/2c honey
1t vanilla
5 cups old fashioned oats
1/4c milled flaxseed
1.5T ground cinnamon
3t baking powder
1t salt
2 3/4c soy milk

Instructions:

  1. Preheat the oven to 350. Prepare 24 to 30 muffin tins with paper liners and spray them with cooking spray.
  2. Mix the wet ingredients together - eggs, applesauce, chopped apple (microwaved and pulsed in food processor), vanilla and honey - until well combined.
  3. Add the dry ingredients and mix well on low speed. Scrape down the sides of the bowl as necessary.
  4. Pour in half the milk and stir it in. Add the rest of the milk and stir until combined.
  5. Scoop 1/4c of the completed mixture into your muffin cups. (The mixture won't rise too much so don't worry if the cups seem a little full.)
  6. Sprinkle your desired toppings on top of the oatmeal mixture just before putting them in the oven.
  7. Bake at 350 for thirty minutes, rotating the pans halfway through. Bake until golden brown and a toothpick inserted into the center comes out clean.
  8. Cool the muffins in the pans for 10 minutes then remove them and place them on cooling racks to cool completely. Store in plastic freezer bags if you plan to eat them within 2 days, otherwise freeze them.

Nutritional Information:  (with estimated yield of 24 muffins)
Calories: 114, Carbs: 23g, Fat: 2g, Protein: 3g, Sugar: 8g, Fiber: 3g
** nutritional facts for muffins without toppings

And there you have it! It's a pretty easy recipe to follow and it's very healthy because there's no sugar - the honey serves as the sweetener. If you don't have honey, you could try agave nectar, stevia or splenda (the amounts may differ). If you do end up freezing these muffins you might want to thaw them overnight in the fridge if you plan to eat them in the morning. Enjoy!!

** Please do not copy these images for your own use. You are free, however, to share this post on Pinterest and other social media sites.


Thursday, June 21, 2012

Getting Started!

Hello and welcome! My name is Kate and I am a young twenty-something with a passion for baking. Though I have always been a creative person and I grew up learning how to cook from my mother, it has only been during the past few months that I really discovered my love for baking. I suppose it started when I purchased the Martha Stewart "Cupcakes" cookbook for my mom this past Christmas. She hasn't cracked the book more than twice since I gave it to her, as far as I know, but I've certainly put it to use. The first time I flipped through the book I found myself marking every other page with scraps of paper, designating them as "must-try" recipes. Every time I went to a party or to an event where more than two people were gathered, I used it as an excuse to try a new cupcake recipe.

Over the past few months I have begun to explore and expand my new-found love for baking and am considering how to make it a permanent part of my life. I was recently hired by a new local restaurant called the MAC Diner to be a prep cook and the restaurant's lead baker. Nancy, the owner, has a big personality and even bigger plans for this 70's-themed diner which will be serving specialty mac and cheese, breakfast all day and (of course) my confectionary creations. The restaurant is still going through the inspection process but we hope to open after the July 4th weekend. I am SO excited to put some of my cooking skills to use and to have the opportunity to do some baking.

By now you may be wondering what the purpose of this blog is. This is not just a place for me to ramble on about my new favorite recipe (though I'm sure I will do some of that...). It will also be a way for me to share some of the things I learn along the way. Did I mention that I am thinking about going to culinary school? I already have a BA in English so it might seem silly to go back and get another undergrad degree, but the idea of pursuing a degree in Baking and Pastry, and potentially starting a career in this field, excites me. As I embark on this journey, I hope you'll join me in learning, experiencing and tasting new things. I'll share with you my successes and failures, posting tips and (of course) recipes that I discover along the way. I would love to get your feedback, too!

Though baking is my new obsession, I have always loved anything and everything that involves being creative. That being said, don't be surprised to find some DIY and craft posts sprinkled in among the recipes. Sometimes I feel like a bit of a hummingbird, always flitting from one flower (or project, in this case) to another. Hopefully you'll enjoy seeing what I come up with and I hope you'll share with me some of your own ideas. Happy reading!